Building An Outdoor Retaining Wall
At Materials In The Raw, we are passionate about outdoor living design! We believe that retaining walls give a polished look to any backyard and help to create a more defined outdoor living space.
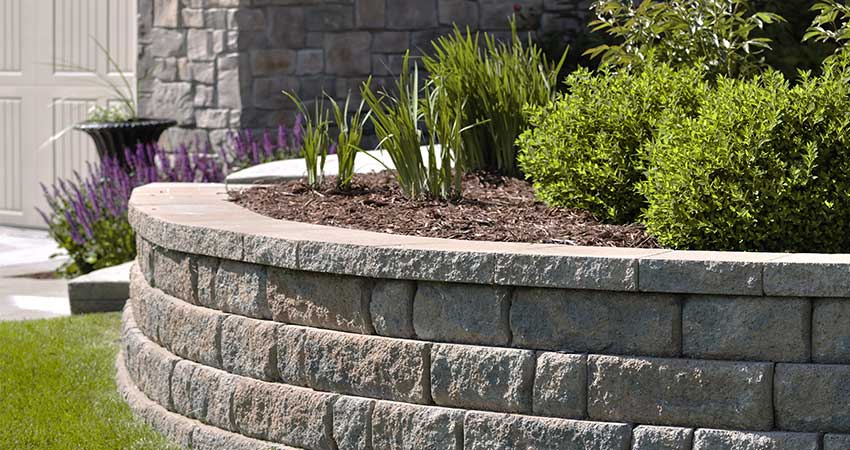
Ever thought about adding some much needed functional space to your backyard? Well we may have just found the perfect solution to help out, and that’s by building your very own outdoor retaining wall. This is a feature definitely worth integrating into your own yard for the simple fact that it helps to increase your usable space, and provides immediate structural support, value, functionality, and aesthetically pleasing appeal into the backyard.
Not only will it help accommodate to sloped areas, it can turn a spare piece of garden into an extension of your living environment. A well carefully designed retaining wall can add so much flair and personality into your yard. They flow naturally with other features to transform your landscape into a practical and prominent work of art.
Materials In The Raw would love to make this process a whole lot easier by providing a step-by-step process, equipping you with the necessary tips and tools to be able to get a start on building your very own retaining wall.
Step 1: Planning & Designing
Retaining wall construction is a labor-intensive process. This is why we recommend that you take the time to carefully plan your design and layout. This is a critical step in the process as it ensures you use your money and time wisely.
Key factors to consider:
- Surrounding Features – You should think ahead, and know how you wish to use the space
- Wall Height – Short walls require minimal digging, where you can use small blocks and don’t need any permits to proceed. Large walls clearly need larger blocks, with more elaborate and bigger designs, with a whole lot more digging.
- Dirt – Majority of your time will be given over to the moving of dirt. Consider how much dirt you’ll need to complete the job, and think of smart ways you can strategically move it around without having to get rid of any when the job is complete.
- Grading –You’ll want to be mindful of how your garden is setup to drainage placement, and choose to either work with this existing draining or modify it completely. You must however, plan the grading around the retaining wall so water drains off the property.
- Landscaping Blocks – With a wide assortment of retaining wall designs to choose from, Materials In The Raw can easily help you decide what blocks are best to use for your retaining wall.
Step 2: Mark Out Designated Area
Start by clearly identifying the designated section of the backyard you wish to work on using, and mark its location out with white spray paint. Work off this as a guide on the ground.
Step 3: Proceed With Digging The Site
Once the space in which you’ve allocated for the job is marked up, it’s time to start digging! Dig a trench about twice as wide as the blocks you’ll use, as you must accommodate for the paver base and for the first initial blocks to get halfway buried. Depending on which blocks you’ve chosen, you want to be digging deep enough so that there is plenty of wiggle room for the block to be sitting comfortably, without cutting corners or digging your trench too shallow (e.g. 6’ tall blocks would need about 9’ deeper than ground level).
Step 4: Put Down Layer Of Packed Gravel Base
If you want to see the retaining wall have longevity, you must be putting down a layer of packed gravel base (or concrete) before you start laying any blocks down. This step is not optional and is essential for it to succeed. You want to make sure you’re following your local block supplier’s guidance on base depth for the system you are using, as typically, 6’ of packed gravel base is suggested. Then, whether you use a hand tamper or machinery to assist, you want to be adding your gravel base in 2’ layers, and packing it down thoroughly after each layer.
Step 5: Level Your Base
Take the time to level out the gravel base by setting a stringline with stakes or with a line-level. This is important as it may take multiple passes to get it exact and precise, so ensure you’re establishing clear lines to build from and know you’re working to exact dimensions. You’ll want to avoid building your wall at an incline and rather, if it’s going up a hill, then you’ll want to step it up instead of sloping the actual blocks. The blocks themselves must be level for structural purposes.
Step 6: Laying The First Row Of Blocks
Now it’s time to lay down your blocks. Levelling side-to-side and front to back, you’ll begin starting at one side of the wall and working your way through installing one block at a time. Set each of the blocks down using a rubber mallet once they’ve been levelled. It’s important to reiterate the importance of this first row, and that once they’re down, they’re down for good.
This can be a very time consuming portion of the process, however you’ll find using sand to make minor tweaks along the way of levelling your blocks will free up some time, as it’s much easier to work with than gravel.
Step 7: Adding Gravel Behind Your First Row
Now you are on the home stretch! Once you’ve got the first row of blocks in place ensure they are aligned. Shovel gravel in to fill in the area then add first in front of the first row of blocks to lock them in place. You’ll want to be careful not to pack the dirt in too hard or you’ll move your blocks.
Roughly speaking, you’ll want about 6 inches of gravel for drainage all the way up the wall. Now you have your first layer in just add the blocks one by one making sure to overlap the seems.
Step 8: The Final Layer & Adding Soil
To complete the retaining wall you’ll want to glue down the final layer with cement adhesive. You can purchase this in store. Once you’ve done this use a caulking gun and the adhesive and apply to the bottom of each block on the top layer before placing it to complete the wall. Finally, fill the last remaining section with soil to cover the gravel and there you have it!
If you have any more questions don't hesitate to contact us or viist us in store!
From
The Management and Staff
Materials in the Raw
About Materials in the Raw
Materials in the Raw (MITR) was established at Casula in 1988 as a bulk Landscaping materials distributor reselling sand, soil, gravel and mulches. MITR specialises in the supply of landscaping and building materials from multiple locations in the Sydney Metropolitan Area.
We deliver paving supplies to all Sydney regions including: Sydney City, Canterbury-Bankstown, Eastern Suburbs, Forest district, Hills district, Inner West, Macarthur, Northern Beaches, Lower North Shore, Upper North Shore, Northern Suburbs, South, western Sydney, Southern Sydney, St George, Western Sydney and Greater Western Sydney. If you are would like paving supplies delivered outside of Sydney please contact us for delivery prices
Our Sydney outlets are located at:
Chullora: Corner Hume Highway and Davidson Street
Guildford: Corner Ruby and Oxford Streets
At MITR, our customers are extremely valuable to us. It is our mission to help you build the very best with our diverse range of products and commitment to great service.
Our experienced and enthusiastic staff will work with you to make sure you get the job done in the right way. All MITR employees are trained on a regular basis so they are up to date with the latest products, trends and tips.
We are determined to be the best in the industry and we go beyond Landscaping Supplies and building materials. MITR has a genuine commitment to supporting local communities to keep them strong and their environments clean.